Showing posts with label Blogger trics. Show all posts

Facebook Plugins for your Blogger

Facebook, the topmost social networking site, is helping bloggers to increase their readers by providing them with many tools. In addition to the 'Like' button for your page, Facebook provides many other features which you may not know. Some of there are Send, Follow, Recommendation, etc. This post is about Facebook's plugins for blogs and websites and their advantages. These plugins help readers to like, comment, send, share the posts they like or follow the blogger or the blog or to sign up for your site with their Facebook site. Being a blogger you gotta be on-par with the social networking tools and plugins.

The following are the plugins provided by Facebook.

Like Button
Most of you might know about this plugin as, I think, this is the most used plugin. This button lets the readers to 'like' a post in your site. As with the Facebook posts, the post which (in your site) reader likes gets published in the reader's friends' newsfeed. The post is visible to all his friends and in this way it drives traffic to your site.

facebook plugin,like button
Send Button
This button helps readers to Send the content in yout site to their friends. This drives traffic as well.
facebook plugins, social plugins,
Like Button Vs. Send Button
The effectiveness of the 'Send' button is more when compared to the 'Like' button and the spread of the 'Send' button is less when compared to the 'Like' button. For instance, If I am one of your reader and I like a post, the post gets shared in my Timeline and all my friends will be able to see it. But there is no assurance that everyone of them will have a look at the post. But in the case of 'Send' button, I can send a personal message to one or a few of my friends and most of them might have a look at it.

Follow Button
The Follow button replaces the Subscribe Button. This allows your readers to subscribe to your account directly from your site.
facebook plugins, social plugins,

A reader, who subscribes or follows you, will recieve your every single post in their newsfeed. So, if the reader responds to the post with a 'Like', 'Comment' or a 'Share', It gets published in his Timeline and this drives traffic to your site.

Comments
This plugin helps your readers to comment on any post in your site. If the reader comment's on your post, it gets published in his friends' newsfeed and this drives traffic to your site.
facebook plugin, social plugins

Activity Feed
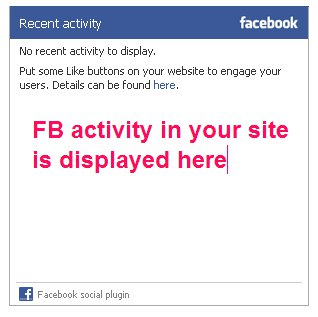
This plugin shows readers about the recent Facebook activity in your site. For example, if any of the readers comment, like, send or share any of your posts, the post will be visible in the Activity Feed box for other readers to see the post.
recent activity plugin, social plugins

Recommendations Box
This plugin gives users a personlized list of suggestions for the posts in your site they might like.

Recommendations Bar
This plugin allows readers to share and/or like the content and to get recommendations.

Like Box
This plugin enables users to like your Page in Facebook directly from the site. This buttons is quite different from the like button. Like buttons allows users to like a particular post in your site. On the other hand, Like Box helps users to Like your Facebook Page.

Registration
This plugin allows your readers to sign up for your website with their Facebook account.

Login Button
This plugin, in addition to the Login Button, shows profile pics of the reader's friends who already have signed up for your site.

Facepile
This plugin displays the Facebook profile pics of users who have signed up for your site or have liked your page.
Read More »

Image Optimization In Blogger To Drive Traffic

The main aim of any blogger is to get as many views as possible, I guess. Your images can help you get your more views. All you gotta do is just to put the keywords within the image. Here is the process. But read on till the last word.

About Titles and Tags
The Tags and Titles in the images, that you use in an image, describe about the image to the Google Search Engine bots as these bots cannot read the text on images. So, using these tags and titles you can get more traffic.

Image Tagging
Procedure-1
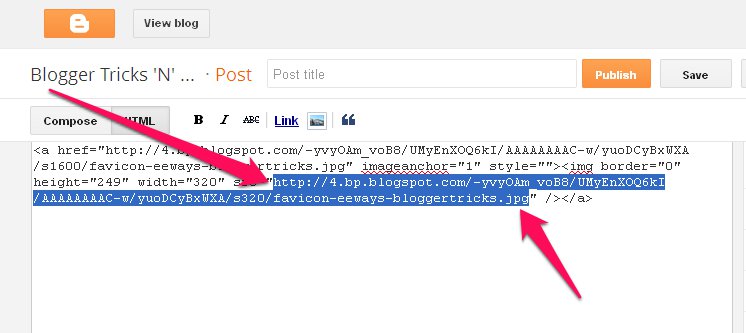
As soon as you upload an image, you get a code in the HTML. Change the code of the image as follows, adding alt="KEYWORDS" between. KEYWORDS is replaced by your keywords. For example, if the image is of Eminem, you can replace "KEYWORDS" by "slimshady,marshall-mathers". Still didn't get me. Well, go through the images. 
BEFORE
image-tagging,optimise-image,image-optimization,
AFTER
image-tagging,drive-traffic,image-optimisation,
Click on the image for a bigger view
This method, called as image tagging, can bring you a noticeable increase in amount of views by driving traffic.

Procedure-2
Still can't figure it out. Well, here's quite simple and direct process. In blogger, by clicking on the image, you get, options below the image. There, click on the 'Properties'. Now, you are prompted with a pop up asking you to enter the Title and Alternate Search Keywords through text boxes mentioned as 'title text' and 'alt text' respectively. Enter the title and the alternate keywords and that's it, you're done. Piece of cake, ain't it?
Click on the image for a bigger view


A few steps that might help you write alternate keywords for your image
  • Use main keyword while writing both title and tags. Take care that you won't make them same.
  • Do NOT write whole sentences. For example, if your post is about Image Tagging, do not make the tag as "use image tagging to get more views by driving traffic", break it into different but important parts, that will define your post, like "image tagging","drive traffic","image optimization". Hope you got it.
  • Do NOT try to tag a large number of words. Make the tags limited to three or four solid words.
So, that's it I can tell you for now. Keep visiting for new tricks and tools. Happy Blogging :D.
Read More »

Show Your Javascrifts/HTML and CSS Codes in Bulbs Lights

Hi Friends Today Known How to Showing HTML/Javascript are your important matter is a most important part. Every Blogger try something new their HTML/Javascript codes differently. Today i am to show you this amazing tool which shows your HTML/Javascript Code in light of glowing bulb. Actually it is a magic of css, there is no need install any thing, you can get it just by adding a simple code.

How to Add It Explain Below

1. Go to your Blogger > Design > Edit HTML
2. Now Search (ctrl+f) for the tag ]]></b:skin> tag.
3. Copy and Paste Below Code and Past Before/Above this Code ]]></b:skin>

.code1 {
overflow:auto;width:503px;height:200px;
font-family: "Consolas", "Courier New", Courier, mono, serif;
color:#848176;
margin : 15px 35px 15px 15px;
padding : 10px 10px 10px 35px;
clear : both;
list-style-type : none;
background : #000000 url(https://blogger.googleusercontent.com/img/b/R29vZ2xl/AVvXsEjmheehhd8uwMBArIXpf0JAysObLV84xOAnatZpreUl-2a6NwHSYcNobNJa-vDh0ZlBMhTCGGzDNpeQIgFy648HLKD0dSDlG5OhIpUwJNBzThc-2ZugB41kugSZO-QPd9BR_hg__0BzxPuf/s320/btsnts-show-codes1.jpg) repeat-y top left;
border : 1px solid #000000;
border-left:20px solid #ccc;
-webkit-transition:all .3s ease-in-out;-moz-transition:all .3s ease-in-out;-o-transition-duration:all .3s ease-in-out;transition:all .3s ease-in-out;-webkit-border-radius:3px;-moz-border--moz-border-radius: 23px 20px 20px 20px;border-radius: 23px 20px 20px
}
.code1:hover{
background : #000000 url(https://blogger.googleusercontent.com/img/b/R29vZ2xl/AVvXsEjk_FMf2XwDuEBOZU5wo0IFXqhW7EIUcnNdjumGD8M1lbJIARPGhyphenhyphen91s6Z2iSVaIx1zVud12-tgW1HiMT1wgYs1tMAeEhACN16eC903dWifwUivRc-JCkfzaBrMRoBwMHd1u9JfAFKZN7lc/s1600/btsnts-show-codes2.jpg) repeat-y top left;
color:#FEF9BF;
border : 1px solid #000;
border-left:20px solid #ccc;
-webkit-box-shadow: 0px 0px 10px  rgba(0, 0, 0, .3);
-moz-box-shadow: 0px 0px 10px  rgba(0, 0, 0, .3);
box-shadow: 0px 0px 10px  rgba(0, 0, 0, .3);
box-shadow: 10px 10px 5px #888888;
And Save your Template

And Now add Some More Important Code to Show This Magic

1. Go to post editor and choose Edit HTML

2. Add <div class="code1">Your Code Here</div>

Source Form
Helper Blogger Thanks to Help Blogger
Read More »

Star Rating for blogger - Graddit

Hi Guys a few  Days  i am tried to Keep Blogger default star Rating ? After  I am Search in google i find a better one Graddit.com. a star-rating system that work for blogger. I Satisfied this , So in this post i will show how to add them to blog. may be use full this tip for you.

See Here Video Tutorial

Below are the explained to add 5 Star Arting to your post

1. Go to Blogger Dashboard > Template > Back-up/Restore > Download Full Template After that Edit HTML > Click Expand widget Template

2. Find (ctrl+F) the code </head> and paste the below code before it.

<link type="text/css" rel="stylesheet" href="http://static.graddit.com/css/graddit.css"/>

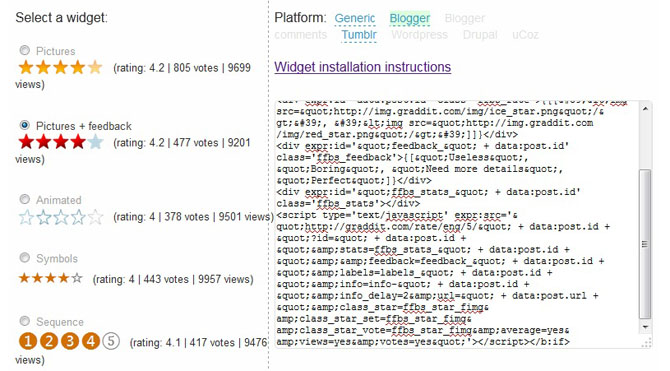
3. Go to Graddit.com. choose from the different styles that will suit your taste you want to apply. Click on blogger link


A Text appear with the code inside. Copy the code.

4. Now Go to Your Dashboard > Template > Back-up/Restore > Download Full Template After that Edit HTML > Click Expand widget Template find the code <data:post.body/>

And Paste the code you copied in Step 3 before <data:post.body/>

Thats all. Save your template and you Can check the results.

I made a demo Here Star rating for this post, See How to Work And you deside Install are not..

Read More »

Change Max Results of Blogger Label or Tag

Hi Guys some of you are maybe opend by 20 max Results When you Click your own Label or Tag of Blogger, and it make your page are your blog very long to the bottom. Blogger set it Defaultly to 20 and it may be slow your site 20 posts in same time. How to Change it..? Ihave Face this problem and Search in Google about this problem I got Solution On this . That I will Share with u ... I Think this Solution is Solved ur Problem also...

Ok Now Follow these Steps.

First Login your Blogger

And Get to Dashboard and Click ' Latout' of Blog Whitch you Wish to Changing its Max results Now, go to ' Eit HTML' and Tick Expand Widget Templates

Now Search This code

data:label.url

Replace all This Code data:label.url with data:label.url + "?max-results=3"

The '3' in This Code Above means That a page will show 3 posts ( On each) Page. you may change That number you Want. But We recommend to Make the Posts Same as how many the first page of your Blog Show the post. And lower is Better.

Video Tutorial 


Got it? Now Save the layout and enjoy.

Your Blog will not ever has long page again.
Read More »

Google Author Rank - An Overview

Author Rank

Author rank is a feature from Google. Author rank and its working is similar to Page rank. Didn't get me? Well, Google gives a Page Rank to a page on the basis of traffic, page hits and other factors. And the Pages with higher Page rank are given a better position in Google Search Results. Now, the feature, Author Rank, has been introduced to rate the people or the blogger who write that content.

Untill Google + stepped into the web market, Google had no way to identify the Author. But now, through Google +, one can also know almost everything about the person like age, qualification, personal details and so on. Now, the sole purpose of the Author rank is to identify the author, their skill in certain subjects and what others think of his content.

There are quite a few things that are likely to effect the Author rank. ANd they are the no. of followers the author has in social networks, how often the author's content is shared, Plus 1's, likes, tweets, mentions etc. One thing that I want you to know is that the Author rank depends only on the above factors but not just the website or the host his content is published. Author rank will influence a content's search results performance. So your Author rank will influence your content's rank.

Author rank will inform page rank and this means that an Author with a higher rank will also effect a site's performance in Search Engine Results Page (SERPs).

Getting Started

First, you need to claim authorship of your content. You can do this by blogging through a verified Google+ profile. Your Google+ profile must have a link pointing to the pages/websites that host your content. You can claim authorship by inserting the tag <rel=”author” link=”your-googlplus-url” /> into your content. I'll discuss even the other ways to claim Authorship later. If you have several authors producing content for your website, you'll have tag each author in their respective articles and link to the website from the "Contributes To" field in Google+ Profile.

Tips to get a better Author Rank

Improve your Social activity


Try to increase the number of the circles you are in. This indicates how popular the author is and his engagement on Google Plus. Get more number of followers.
The no. of +1's and Shares do count. Not only +1's and shares in Google Plus counts but also likes, shares, tweets etc. in Twitter, Facebook and other social networking sites do count.

Which counts more +1 or a Share

             +1 and share are not same. But they do have effect on your Author Rank. Now you might have a doubt which effects most. Well, you all know that +1 and Share in Google+ are similar to that of Like and Share in Facebook. +1 function is similar to that of Like. And you know, Like is easy to click and is just an easy and quick task. It doesn't take much time. But, only good posts are shared. Get linked with other Google tools and sites like YouTube etc.

So never forget to share, +1 or like a good content that you pass through because that might effect the authors Author Rank.

Write Guest Posts

The number of sites you contribute does matter to decide your Author Rank. So, write as much as guest posts you can and do contribute to other sites. Try to guest post in blogs with high Google Page Ranks. Because acceptance as a guest blogger by other popular blogs is a measure of your popularity as an author.

Do reply to comments on your post

Respond to the comments of your reader's as the number of comments on your post is important. This shows the way you treat your readers.

Stick to your sort of Content (or) niche

Lets start with an instance. How would it be if an author who is good at creating posts about technology posts about a food recipie. Got me? Expertise is the main things to improve Google Author Rank. By posting something out of your niche, you dilute your niche Author Rank and also lower your Author Rank

These are the few steps to increase your Author Rank. But, Content is the important thing. So, first make your content as good as possible. Happy Blogging........... :D


NOTE: At present Google Author Rank is inactive. It might be out in couple of weeks or so maybe a few days. I guess it might take even 6-9 months for Google Author Rank to come into full effect.......!
Read More »

Integrate your Blogger with your Google Plus

Well, integrating your Blogger with your Google Plus helps you a lot. Every post you publish on Blogger will be published in Google Plus. If anyone likes the post, he might +1 your post and that post gets published in his Google Plus. In this way, it helps you to increase the reach of your posts. Now, many of you might not know how to integrate your Blogger with your Google Plus. Well, don't worry cause I'm gonna say you that.

Here's the process. This is not that tough process though. It's quite simple.

1. Click on the 'cog' icon in your blogger.
2. Click on 'Connect to Google +'

3. Then, accept the 'Terms and Conditions' and Click 'Switch Now.'
4. Select the blogs which you'd like to display on your Google Plus.

That's it you're done. Here's the video tutorial.

Read More »

Adding Favicon In Blogger

In my previous post, I discussed about adding a favicon to blogger. Well, here's the another way. This way is way too simple and a perfect way to follow for beginners. This process may seem a bit silly, but it works :). So here I Go.

First download your favicon in any of the image formats like png, gif, etc. Then upload the image to blogger and copy the link given by it.


 Then, search for

<b:skin><![CDATA[/*

 in your template's html. To edit your template html, First click on the 'upward arrow mark' beside your blog in the control panel and then select 'Template'. Then click on the 'edit html' option. Now you get the html.
Then search for the above code.

Above the code, paste the following code.

<link href='IMAGE URL HERE' rel='shortcut icon' type='image/vnd.microsoft.icon'/>

and replace the 'IMAGE URL HERE' with the url which we copied earlier.
(For Video Tutorial Click Here)

That's it. You're done. Just save the template and now you have a blog with a favicon.


Read More »

Adding Favicon In Blogger

I was unable to accomodate video in the post because of so many pics so I posted this video as another post.

Read More »

Adding Favicon To Your Blog

Well, I'm back again. Now, I'm working on favicons. So I'm on my way to list all the sites. But before, I thought of making a post about adding a favicon to a blog. Because, it doesn't make sense when you know how to make a favicon but don't know how to use it. So, here I go and, by the way, you can refer my post about creating favicons to create a perfect favicon for your site.

Adding a Favicon

Create your favicon by using one of the tools available. You can directly upload your image or create a new one. After uploading an image or creating a favicon you can download the automatically-converted-icon form of the favicon and save it to your desktop.

Next, you need to upload it to some host like Favicon Hosting and Genarator etc. You can even get a lot of hosting sites online to host .ico files. Once you upload it to a host, you get a direct URL to the favicon file.

Now go to your blogger dashboard > layout > Edit html.
There look for the code

<title><data:blog.pagetitle/></title>

<data:blog.pagetitle/>
and add the below code just after the above one.

<link href='ICON FILE URL' rel='shortcut icon'/>
<link href='ICON FILE URL' rel='icon'/>


and replace the 'ICON FILE URL' with the URL of your icon file.
Take care that the code you paste is in between
<data:blog.pagetitle/>
<data:blog.pagetitle/><title><data:blog.pagetitle/></title>
Your Code
<![CDATA[/*

If you are unable to follow the above process, here's another way.
Read More »

Share Blog updates on Google Plus

Social media promotion is every blogger's need to spread its readership. And this is the reason why bloggers need to share their awesome content so that people around the world can know about it. Now, Google's Google Plus came up with a new feature. Google recently realeased the Google takeout service that lets you merge two Google Plus accounts together. Now, you can connect your Google Plus account with Blogger to easily share your posts and also gain recognition for your work on social media. A share box will automatically appear when you publish a post which lets share your content. Here comes the worst part, it works only for blogger blogs and is not available for WordPress or TypePad or any other publishing platforms.

Getting started
This trick will work only if you have your Google Plus and Blogger profiles under the same Google Account with a common name. If both your profiles are under one account, then you are lucky. Simply log in to your blogger account, and go to your blog dashboard. In the top-right region of screen, you will see a cog icon. Click on the Cog and select the option 'Connect to Google+'. Click on that and you will see a confirmation screen. Now, you are ready to make the switch. Just check the 'I've read........' box and click switch. If in the future, you want to disconnect the two accounts and revert to your blogger profile, you can simply disconnect by using the settings option (Cog option).

Sharing posts
Once your posts are linked, you will see an option to share your posts right from your Blogger dashboard. This will also let you share posts whenever you want, without having to deal with auto pop-ups. Besides this, whenever you publish a post, you will see a pop-up box appear that has sharing options. You can add a comment as you like. You can also choose which circles you want to share the post with. By default, the option will be set to public.

Disabling Share Box
If you don't like this sharing box, you can simply disable it by going into Settings and then to Posts and Comments.

Note :- This feature will not be available to you if you have adult content on your blog.
Read More »

Few Steps To Lift The Page Rank

Google Page Rank has been updated again. The last update took place in August 2012, and the one before that on May 2012. So its pretty obvious that Google is now rolling out these updates quarterly. So the next update is expected to be in the first week of February 2013. And keep in mind that Google PR should not be the priority for you.

As most of you might already know, PageRank is Google's way of asigning a grade to website from 1 to 10. Google rates itself at PR9. And for blogs with little or no investment, the maximum PR ahieved yet is 6. Blogs such as Mashable, Techcrunch, Search Engine Land etc. are corporate websites run by an organiaztion. They have multiple authors as well as marketers and managers who manage and promote the website at the back end all of which requires investment. So, for a low investment blog, the target should be 6. PR is just a way of rating websites. Website with a high PR get crawled and indexed more frequently. For example, a PR 8 website might get crawled several times in minute, whereas a PR 4 or 5 website might be crawled just once per minute. PR is also one of the factors advertisers look for in a blog, but is by no means the only factor. There are a lot of toher factors they look at first.

Well, if you're PR has dropped, don't worry. You can pick it up still. Lots of people think hundreds of backlinks is the way to go. That couldn't be further from the truth. Instead of having hundreds backlinks, its better to just concentrate on having just a few very high quality backlinks. So stop wasting your time commenting on low PR blogs for backlinks. Reather, write a good guest on a high PR blog. Adopt this practice, and you'll see your PR increase in the next update. Besides that, you should concentrate on the quality of your page, as well as some of the basic SEO, so that google recognizes your effort.

As mentioned, PR is just one of the factors advertisers look for in a blog. But there are other more important factors as well. The first thing they look for is your readership, i.e., whether you have an active community of followers who participate on yourblog. Thencomes social media fan following, and even though such stats could be inflated, it is the activity about your blog that counts. Next comes traffic stats, and Alexa ranking. Advertisers look for how many people visit a site daily, and Alexa is a good stats provider.
Read More »

Wibbitz : Turn your Blog posts into a Video

Most of the people, especially Bloggers use their writings to convey their message to their readers. Well, what if we use images or videos? that might be more effective. Of course most of you might be doing that but how about presenting your blog posts in the form an awesome video? Cause most of the people are not interested to read such lengthy posts. Now you might not know how to create and edit a video, but don't worry, here's a tool for you. Its Wibbitz. This tool will help you make a video from your blog posts with little effort.

Wibbitz is a web app that will crawl your website and extract the important information. This will then be converted into an audio and video presentation. The audio can include narrations of your latest blog posts, so that your readers can hear the updates rather than reading them. This is relatively unique, simple and effective concept, isn't it? You can use this for better advertisement of your website. A video can say a lot about your website or blog, and this will get you more followers as a result of video marketing.

How to create a video using Wibbitz
The following are the simple steps.
Visit Wibbitz Homepage.
Fill the email and site URL fields, and click on Create Your Clip. (You'll find them at the bottom of the page)

Once finished you'll get an embed code for your video. Well, this is all you need. Now, if you want to customize this video, you can do it using the Customize Clip option. Now, you'll be able to re-size the video, put in a voice over, or put in Loop or Autoplay. You can also change the Soundtrack from among the six different options. Once you're done, click on Update Clip.

After the video is generated, you can use the embed code to publish the video. The video shows latest posts and even provides an option in the video itself to read the whole post.

This is a pretty good tool. This will create HTML5 embed code for you, which will be accessible across multiple devices. The voice synthesizer is pretty good too, with just a single hint of synthesized speech. The biggest drawback is that it can't process special characters such as the apostrophe. So, it speaks out HTML codes for them, which sounds awkward.

Here's the video tutorial.
Read More »

How to Automatically Publich Blog Posts Directly to Face book via Networkd Blogs

How to Automatically Publich Blog Posts Directly to Face book via Networkd Blogs
Networkblogs Application For Facebook Offers this service for Face Book Users users to automatically publish Blog posts directly to Facebook wall.

To Automatically publish Blog posts directly to Facebook via networked Blogs

Steps:

1. Open Below url

http://apps.facebook.com/blognetworks/

02. Click the Login Button


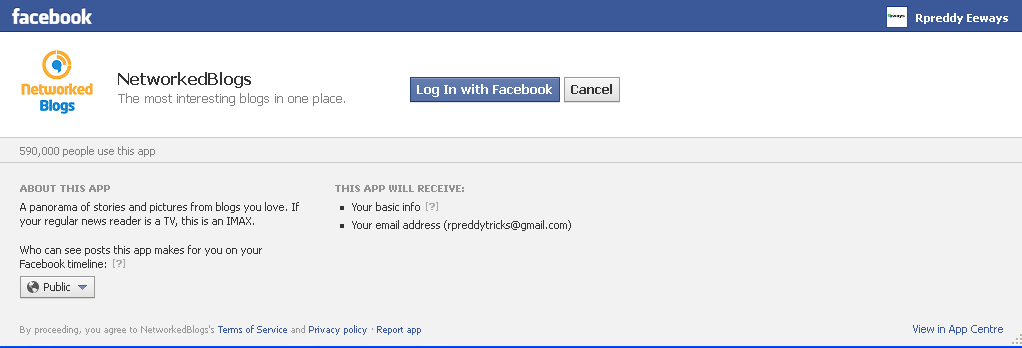
03. Then Click loging with facebook button

04. Enter ur Facek E Mail ID And Passwors

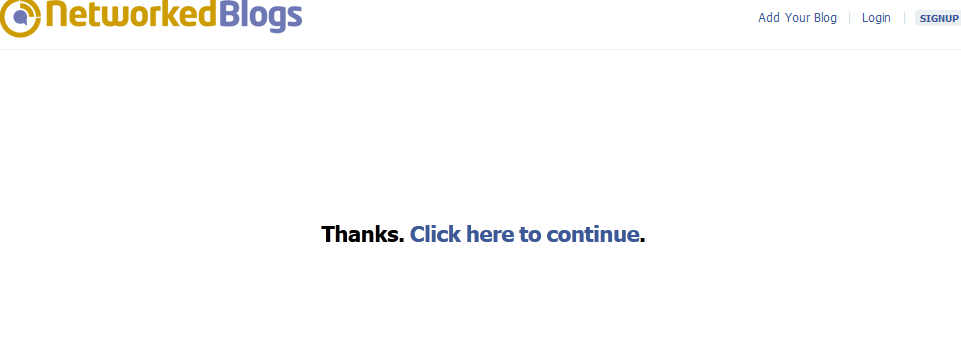
06. Then Click " Click Here to Continue link


07And Next Add ur Site/Blogger Name Url


Registered u r Blog all Required data.

08. Conform ur Owner Ship

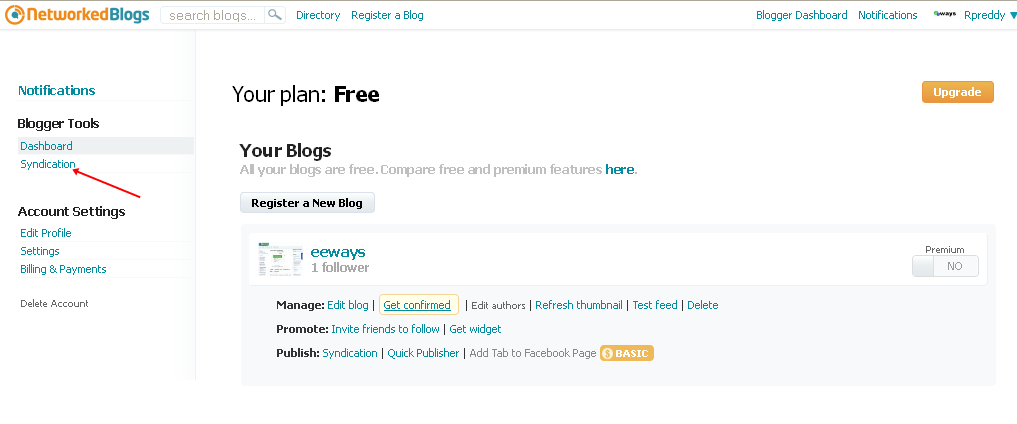
09. Go To Network Blogs Home Page and Click Blogger Dashboard


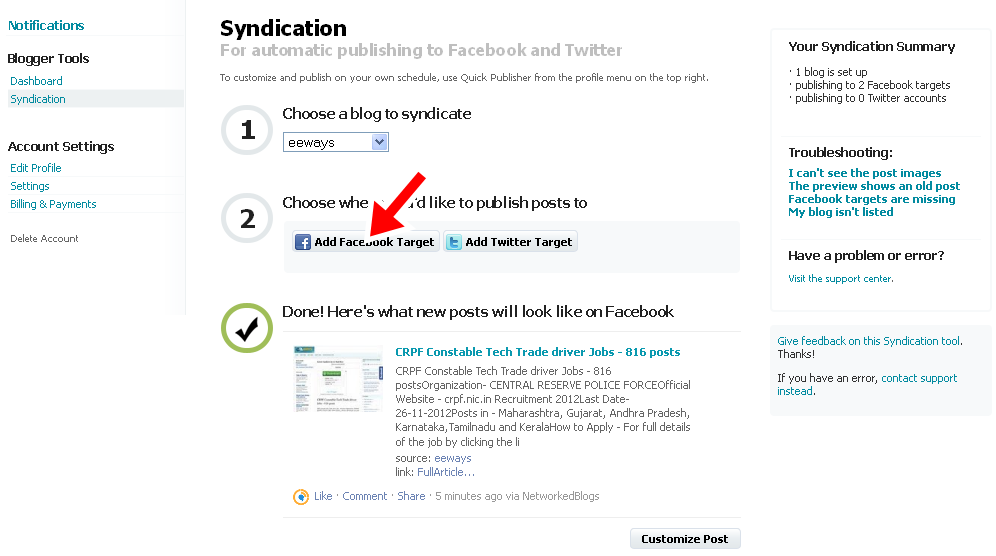
10. Click Syndication Tab under Blogger tool.


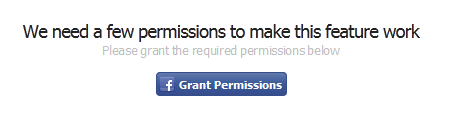
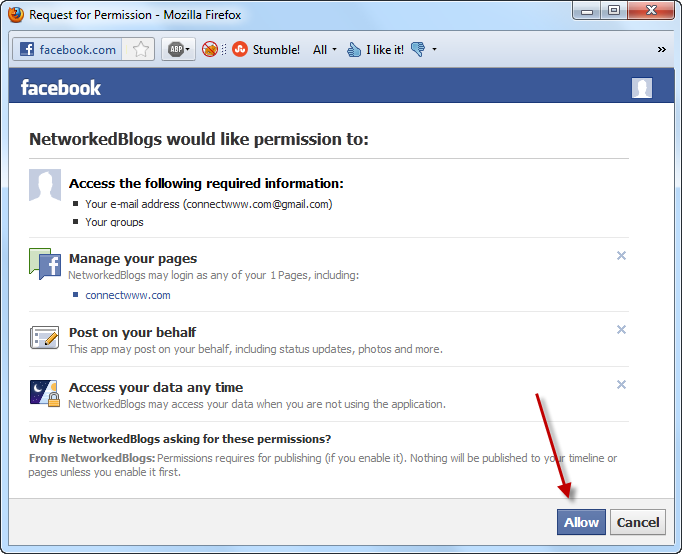
11. Click the grant permission tab and then Click Allow button


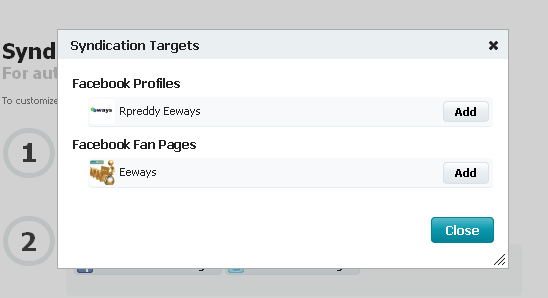
12. Choose Ur blog to Syndicate And Click Face Book Target Buttons


13. And Select U r Profile are Fan Page and click add button

Thants It Thank u Enter ur Email Id In Subcription Box All Latest Updatest Reach in ur email ID

Read More »

Top 10 tools to search popular bloggers in Twitter

Twitter is a really great tool when it comes to looking up for news or getting updates from your favorite Twitterers. For Bloggers, its a good way to build interactions and get ideas.  That gives you ideas to improve your own blog. But there's one question rolling in everyone's mind and it is how to find such blogs and how to look for more interesting stuff that relates to your own niche as well? So here goes the process.

Twitter research
Twitter research should be very first thing you do when searching for people to follow. Hashtags are a really smart way of finding information. People use hashtags to monitor conversations and ger their tweets listed. This also makes tweets public availabe easily. When you search for hashtags, you will get results from bloggers and the top bloggers in your niche are usually the ones talking about the niche often. Take a look at what comes up, and follow the people you think have a substantial following.

Bitly Realtime

Realtime is a relatively new search engine bu Bitly that not only returns results form Twitter but also other social media. It basically tracks the URLs that has been shortened through Bitly. And since many bloggers use URL shorteners, this is a great way to find top influences as well. ALthough the project is still in its beta phase, it already is starting to make a mark for itslef.

Listorious

Listorious is a really great tool for finding popular people on twitter. It has more than two million Twitter users registered, and if you visit the site, you will see a list niches you can choose from to see the top twitterers for a specific niche. You can search for a niche too. And if you think you're popular, you can get listed too by signing up.

Follower Wonk

FollowerWork comes with SEOmoz PRO. It's another great tool for analyzing user bios, searching, tracking, sorting followers and users. All data is constantly updated, so you will get the latest results.

SocialBro

SocailBro has been specially designed for the purchase of discovering influencers based on user-defined criteria. It has full analytical data on folloers, social contact, profile management, and more. It is very powerful tool, but it comes at a price starting from $6.99. Still, a pretty good tool for power users and analytics.

Klout

Klout is another very large application that lets you find influential people. It has over 100 million registered users and you can find from among them. You can also get listed by signing up with Twitter or Facebook.

Suila
A very simple application that's easy to use yet a good one. It has gathered data from millions of users, and ranked the popular ones. You can search for a topic simply and find out the experts on that topic within seconds.

Twellow

A basic list of users based on popularity there are a number of categories with users listed within. You have niches such as News and Media, Sports, Government, Education and more. You can find results based on smaller niches, location or other factors.

Endorse

It works on a relatively different concept. Rather than ranking users according to their number of followers and other data, it ranks them based on 'endorsements', or recommendations from other users. The idea, being the best way to find out about influential people is through socializing.

Science Pond

This is a perfect site for the science geeks out there. It will help you find influential scientists on Twitter. SciencePond has a full list of scientists from Twitter, and who is better to follow than an influential scientist?

So go on. Happy blogging :D
Read More »

Recent Post Widget With Thumnail Blogger/Blogspot

The past days i've shared a tutorial on how you can add a Simple Recent Posts Widget, but today we will learn how to add a recent posts widget which comes along with posts thumbnails and snippets too.

recent posts, blogger widgets


Here is how you can add a Recent Posts widget/gadget with thumbnails to your Blogger (blogspot or custom domain) blog. It's pretty simple. Follow the steps below:


1. Go To Blogger > Design > Page Elements

2. Click on "Add a Gadget" link

3. From the pop-up window, choose HTML/JavaScript

4. Paste the following code:


<div class="eggTray">

<script src="http://helplogger.googlecode.com/svn/trunk/listbadge.js">{"pipe_id":"1a6640e2a78b2c6e736f2220529daae5","_btype":"list",

"pipe_params":{"URL":"YOUR-BLOG/SITE-URL/feeds/posts/default"},

"hideHeader":"false","height":"500","count": 8 }</script>

<div style="font-family: arial, sans-serif; font-size: 9px;" class="ycdr"><a href="http://helplogger.blogspot.com/2012/05/recent-posts-widget-with-thumbnails-for.html" target="_blank" title="Grab this widget">Recent Posts Thumbnails</a> <a href="http://helplogger.blogspot.com/" target="_blank">Blogger Widget</a></div><noscript>Your browser does not support JavaScript!</noscript></div>

<style type=text/css>

.eggTray {margin:10px 0px;padding:0px;}

.ybr li  {border-bottom:0px #cccccc dotted; padding:0px 0px 10px 0px!important;}

.pipesTitle {padding-top:0px;}

.pipesDescription {display:true;}

.ycdr {background:transparent url(https://blogger.googleusercontent.com/img/b/R29vZ2xl/AVvXsEgAM_T3l4hyrGdE2WC2XQWjQ2x0lqH7eO7Ege-DzjNlp78zxMW5a8N1eI-Uac0w3vFyvmgsk4OK8uAv9bkziUjookG-eH5DzqS6QFr0ToQtRAwtUftDbkmOX7fGiNoffDNgDlD951sEDsw/s1600/logo.png) 0px 0px no-repeat; padding: 1px 0px 0px 19px; height:14px; margin: 4px 0px 0px 0px;line-height:14px;}

.ycdr, .ycdr a {color:#999999;}

.widget .popular-posts ul {padding-left:0;}

</style>


Change YOUR-BLOG/SITE-URL with the url address of your site/blog (ex: http://bloggertricslab.blogspot.com) and be careful to have no forward slash symbol "/" at the end of your url


Settings

  • To disable the scroll bar, remove the number 500
  • By default, this widget is set to display a maximum of 8 recent posts. To change this number, replace the number 8 with the number of posts desired
  • if you want only the posts titles to appear, change true to none and "0" from padding-top:0px with 10


5. Save your widget. And that's it!


Read More »

Simple Recent Post Widget Blogger/Blogspot

This Recent Posts widget will show not only post titles but also post excerpts or snippets on your blog.


What you can do with this widget:

  • display post titles only
  • change the number of posts
  • change the number of characters of the post snippet/excerpt
  • show the post dates
See the screenshot below:


How to add Recent Posts Widget to Blogger


1. Log in to your Blogger Dashboard >> go to Design >> Add a Gadget >> choose HTML/JavaScript

2. Choose & Copy the code of one of the options below and paste it into the new HTML/JavaScript:


Option 1: Recent posts widget with snippets


<div id="hlrpsa">

<script src="http://helplogger.googlecode.com/svn/trunk/recent-posts-with-snippets.js">

</script>

<script>

var numposts = 5;var showpostdate = false;var showpostsummary = true;var numchars = 100;var standardstyling = true;

</script>

<script src="http://your-blog.blogspot.com/feeds/posts/default?orderby=published&amp;alt=json-in-script&amp;callback=showrecentposts">

</script></div>

<div id="rpdr" style="font-family: arial, sans-serif; font-size: 9px;">

<a href="http://helplogger.blogspot.com/2012/04/recent-posts-widget-for-bloggerblogspot.html" target="_blank" title="Grab this Recent Posts Widget">Recent Posts Widget</a> by <a href="http://helplogger.blogspot.com" title="Recent Posts Widget">Helplogger</a></div>

<noscript>Your browser does not support JavaScript!</noscript>

<style type="text/css">

#rpdr {background: url(https://blogger.googleusercontent.com/img/b/R29vZ2xl/AVvXsEg7YiIzApV6hoLarNshPV5AxK6OjNKTz8k6ltcci-MMA7JrYRvGSw4o_hVkVdJbZcFISo8OqCBmr7XfN4xWW8YHE1ym5UsmxnwqMO3nW8sW5Q7szeqd9qiaWB8mjJbB5IzSuTBvYSB7M6nx/s1600/blogger.png) 0px 0px no-repeat; padding: 1px 0px 0px 19px; height:14px; margin: 5px 0px 0px 0px;line-height:14px;}

#rpdr, #rpdr a {color:#808080;}

#hlrpsa { border-bottom:1px #cccccc dotted; margin-top:-10px; padding-bottom:10px;}

.hlrps a {font-weight:bold; }

.hlrpssumm {}

</style>


Option 2: Recent Posts Widget Showing Post Titles Only


<div id="hlrpsb">

<script style="text/javascript" src="http://helplogger.googlecode.com/svn/trunk/recent-posts-with-titles-only.js"></script>

<script style="text/javascript">var numposts = 10;var showpostdate = false;var showpostsummary = false;var numchars = 100;var standardstyling = true;</script>

<script src="http://your-blog.blogspot.com/feeds/posts/default?orderby=published&alt=json-in-script&callback=showrecentposts"></script></div>

<div style="font-family: arial, sans-serif; font-size: 9px;" id="rpdr"><a href="http://helplogger.blogspot.com/2012/04/recent-posts-widget-for-bloggerblogspot.html" title="Grab this Recent Posts Widget" target="_blank">Recent Posts Widget</a> by <a href="http://helplogger.blogspot.com" title="Recent Posts Widget">Helplogger</a></div><noscript>Oops! Make sure JavaScript is enabled in your browser.</noscript>

<style type=text/css>

#rpdr {background: url( https://blogger.googleusercontent.com/img/b/R29vZ2xl/AVvXsEg7YiIzApV6hoLarNshPV5AxK6OjNKTz8k6ltcci-MMA7JrYRvGSw4o_hVkVdJbZcFISo8OqCBmr7XfN4xWW8YHE1ym5UsmxnwqMO3nW8sW5Q7szeqd9qiaWB8mjJbB5IzSuTBvYSB7M6nx/s1600/blogger.png ) 0px 0px no-repeat; padding: 1px 0px 0px 19px; height:14px; margin: 5px 0px 0px 0px;line-height:14px;}

#rpdr, #rpdr a {color:#808080;}

#hlrpsb { }

.bbrecpost2 {

padding-top:6px;

padding-bottom:6px;

border-bottom: 1px #cccccc dotted; }

</style>


3. Change 5 (option 1) and 10 (option 2) with the number of posts you want to show. Change false to true if you want the posts dates to appear, and change 100 (option 1) if you want more characters to be displayed.

Don't forget to change your-blog text with the name of your blog or if you have a custom domain change all the bolded line with your address like in this example:

http://www.your-site.com/feeds/posts/default....


4. Save your widget. That's it!! Enjoy
Read More »

Adding Interactive Transcripts To Youtube Transcrips

Interactive Transcripts is a cool, relatively new Youtube feature that is designed to enhance your video-viewing experience. Interactive Transcripts are almost same as subtitles. They are there to supplement the audio to help viewers better understand what's being said. Youtube now has a feature, Interactive Transcripts which are shown seperately below the video. They are interactive i.e., they can be played with the video and also can be viewed sepereately and clickable, so that when you click on a certain piece of text, it'll take you to that particular point of video where it was said.

Why to use this Transcripts

There are many uses for these transcripts. Firstly, they provide subtitles which can be turned on or off according to users' preference. Secondly, they add up to a better video viewing experience to those who can't understand the words said in the video (might be because of different accent or that sort of reasons). A great plus point here is, they make video content searchable! People can simply search for a piece of text, say a song lyric, song at that particular point! That's cool, ain't it?

Creating Transcript files

There are basically two types of transcripts, simple transcripts and captions. Transcript files are simply text files. They contain the main content of the videos.

A simple transcript looks like this

If the video goes "Hey, How are you?"

Hey


How are you

Here each line is seperated by a double line-break. This denotes pause between the two lines. If there's any emotions like laughing or shouting or nothing is being said, it is best to include something like [laughing] or [shouting] just to increase the video viewing experience. The reason you should do this is because Youtube takes care of timing of these transcripts for you. It has advanced algorithms and speech recognition system that actually times the ilnes with the speech. So the sound of laughing or shouting might throw it off. So it is best to include a hint of whats happening.

Captions files are usually in Subtitle formats, such as .SUB ot .SRT. they have timestamps with lines as well. A typical Captions file would like this

0:00:02.480,0:00:08.430
The first line goes here


0:00:08.420,0:00:11.540
Then goes the second line

0:00:11.540,0:00:15.680
Then goes the third line
0:00:15.680,0:00:18.000
Then goes the fourth line

0:00:18.000,0:00:20.000
[pause]

You can manually add time-stamps for your video in a text file, and save it with a .SRT or a .SUB file extension.

Adding Transcript to videos

To add transcript to your video, Log into your Youtube account, and block on your username on the topright of your screen. Then click on the video manager.

you can add transcripts to your existing videos, or you can upload new videos. Next to your uploaded videos you will se an edit option, and an arrow next to it.

Click on that arrow and you get two options viz., Caption and Promote.

After clicking on the transcript or caption file, which will be automatically integrated with your video once the initial processing is done. You should now see a transcript button when you open your videos' public link. Before uploading make sure before uploading the file whether you have selected the correct language and whether it is a caption or transcript. Both work differently, so make sure you choose the appropriate option.

You can turn on captions for any video. This could be great help for non-native speakers of the video's language. Have fun
Read More »

Shortcuts for Social Networking Sites

A lot of people use social media as its a great way to stay connected with your friends and family. Some people deal with social media many times a day. So it would be easier if they learn some keyboard shortcuts, keyboard shortcuts for some basic functions. So here we go.....

The three most important social media are Facebook, Google Plus and Twitter.

Shortcuts for Facebook:


Facebook has based its shortcuts on the browser. So, shortcuts of FB will vary from browser to browser. In Firefox, you will need to add a Shift key before the key combinations given below. In Internet Explorer you need to hit Enter after the combination. Same goes for Mac, except that of Firefox, you need to press Ctrl insteas of Shift and rest of the keys should be same.

Key combinations for FB

Key Combination / Function

Alt+M - Compose New Message
Alt+/ - Main Site Search
Alt+1 - Go To Homepage
Alt+2 - Go To Timeline
Alt+3 - See Friends Requests
Alt+4 - Go To Message Inbox
Alt+5 - See All Notifications
Alt+6 - Go To Account Settings
Alt+7 - Go To Privacy Settings
Alt+8 - Go To Facebook’s Profile Page
Alt+9 - Go to Facebook’s Terms Of Service
Alt+0 - Go To Facebook Help Center

Key Combinations for Twitter:
 
Twitter Shortcuts are easier to use and remember. Twitter even displays the whole list of shortcuts in a pop-up so you can easily look for action you want. To bring up this pop-up, simply press the "?" (shift+/) key.

Shortcuts for Twitter

Key / Function

F - Favorite
R - Reply
T - Retweet
M - New Direct Message
N - New Tweet
L - Close all open Tweets
Enter - Open Tween Details

Navigation shortcuts

? - List of all shortcuts
J - Next Tweet
K - Previous Tweet
/ - Search
. - Go To Top and Load new Tweets
Space - Page Down

Timelines

G+H - Go Home
G+C - Go to Connect
G+A - Activity
G+D - Discover
G+R - Mentions
G+L - Lists
G+P - Profiles
G+F - Favorites
G+M - Messages
G+S - Settings
G+U - Go To User

Shortcuts For Google Plus:


Google Plus has its share of shortcuts even, but they are relatively fewer, and they can only be activated in certain instances, such as when a post or a particular section of the website is in focus.

Shortcuts for Google Plus

Key / Function

K - Go to Previous Item In the Stream
J - Go to Next Item In the stream
Q - Search for People to chat with when the chat window is active
Space - Scroll Down
Enter - Start new comment (when focuse on a post)
Shift+Space - Scroll Down
Enter+tab - End Comment
@ or + - Tag a Person


These are the most used shortcut functions.So here's the end of the post. Have fun with these shortcuts :D
Read More »

Optimization of ULR parameters for Blogger in Webmaster Tools

URL parameters help Google to crawl your iste more efficiently and give priority to your more useful content by controlling the parameters that effect the site content. In blogging platforms like Wordpress and Blogspot, there are several parameters, that effect the page content. Famous among them are replytocom, Showcomment, commentPage, m and utm parameters. Here are the guidelines to get through all this headache and to make it simoe to optimize URLs for Blogger blogs and enhance your SEO.

Important Parameters

To check the parameters Google has found out on your blog, simply log into your Webmasters Account and then click Configurations and then URL parameters. You will see a list of around 7-8 parameters for which you need to specify their behavior. The number of these parameters could be greater if you are using Google Custom Search.

Some of the Parameters are

1. showComment
2. m
3. commentPage
4. utm_source
5. utm_medium
6. utm_campaign
7. max-results
8. updated-max
9. share

Parameters follow a URL with a question mark.

Optimization settings

You will find Edit and Reset link to the right of each parameter. Make the setting for each parameter one by one as shown.

Points to Remember

1. This method will only make crawling easy for Googlebot and will not make any of your pages disappearing.

2. You need to set Crawl and Effect entries only.

3. To see the structure of the URL you can click "show example URLs" in the popup window to precheck how the URLs look like.

4. Effect Paginates here is used for CommentPage and m because both are simple identifiers to show page number for comments greater than 200 in Blogger.

5. Effect Sorts is chosen for max-results and updated-max because both sorts the page content in order of time and date.

Reductoin of crawl errors

Yes, it does reduce the crawl errors. Most of the errors are caused by duplicate URLs or due to absence of canonical link attributes. This methods makes it extremely easy to control the URL structure of your blog within your webmasters account.
Read More »
 

© 2011. All Rights Reserved | Blogger Tricks 'N' Gadgets | Template by Blogger Widgets

Home | About | Top ▲