Screen Capture Tools (Online, for Mozilla and for Chrome)

We have so many things on the internet that we wanna store as an image but not a page and some of us might not the way to do it. So, in this post, I will be discussing about various sites, plug-ins for Mozilla and extensions for Chrome that help you take a screen shot. These are very helpful and are easy to handle.

Fire Shot - Plug-in for Mozilla
                               This is a very handy plug-in or add-on available in Mozilla and I assure you this will never let you down, not in any case. You can do almost a complete editing of a picture like annotating, adding watermark, highlight particular text or area, crop, edit, draw, blur and a lot more.

How to get this
  • Visit the Fire Shot page on Mozilla
  • Click on 'Add to Firefox'.
  • Then, click on the install
  • If it doesn't work as soon as you install it, go to add-ons tab (ctrl+shift+A).
  • There under extensions, click 'Enable' beside Fire Shot.
  • It asks to restart to Firefox, do as it says.
Now you're done with the installation of Fire Shot.

Working
  •  Right Click on the page that you wish to capture, then click on Fire Shot.
  • It provides you options like Capture Entire Page, Capture Visible Area and Capture Selected Area.
Difference between Capture Entire Page and Capture Visible Area : The difference between these two is quite simple. If you choose Capture Entire Page, it capture the page from top to bottom, and If you choose Capture Visible Area, it captures only the area of page that is visible on your monitor i.e., the area of the page that you're in.
  •  And, when you click on any of above three options, you are given options like edit, save, save as pdf etc.
  • Select the option that you want. After that, you are allowed to select an area of the page if you choose Capture Selected Region or captures automatically if you choose any of the other two options.
Editing and Storage
           If you choose 'Edit' option, you can get a wide range of features to edit your pic. Now, we go in detail about the options and their functions.
  • You are provided with basic options like export, upload, copy, mail and print. Now, when I say 'Upload', you might get a doubt, "Where does the image gets uploaded?" There's a site called easycaptures.com. You can create an account an upload screen captures and you pictures to the site or you can upload anonymously.
  • You are given a hell lot of options through which you can crop, add a shape, draw anything you wish to, highlight an area, add a pointer, add a text, add another image etc.
  • The features that I like the most in this add-on is Invert and Glow. With these features, you can highlight everything from an image to a text.
Now, here's the drawbacks of this add-on. The sound effect when you capture is a bit irritating. You cannot use Mozilla when the Fire Shot editor is running.

Here's the demo given by the Fireshot.

Awesome Screenshot : Capture and Annotate
                           This is an extension in Google Chrome that helps you capture. This extension provides most of the options, but not all, provided by Fireshot.

How to get this
  • Go to Awesome Screenshot page on Google Chrome.
  • Click on 'Add to Chrome' and then 'Click Install'
  • After installing the extension, you get a logo (camera lens) to the right top on the screen.
Working
  • Click on the logo and you are given three options Capture Entire Page, Capture Visible Area and Capture Selected Area. Choose as you wish according to your need.
  • After capturing you are given options that allow you to edit picture. Options are almost similar to that of Fireshot.
Editing and Storage
                             Editing with this extension is easier and, like I said, its almost similar to that of Fireshot. You can crop, annotate, draw lines etc. With this extension you can highlight an area in the picture but not like the way you can in Fireshot. The highlight feature in Fireshot is kind of more effective.
 
                              You can store your screen captures temporarily in awesomescreenshot.com and that gives you a link through which you can share your screenshot. Or you can save it on diggo.com or Google Drive.

Online Screen Capture Tool - Web Screenshots
                                     This in an online screen capture that helps you capture. It's quite simple to use. You give it an URL and it takes a snap of the page and gives a link to download the screenshot.

How to Get it
  • You need not install any extension or add-on. You just go to the website and provide the URL of the page that you want to take a snap of.
Editing and Storage
  • You neither have options to edit the picture nor to store it online.
There are too many drawbacks for this online tool. First thing is you can't capture a particular area on the page. You can't use this for sties like Facebook. For instance, if you wanna take a picture of your homepage in facebook (the URL of your homepage after logging in is www.facebook.com) and you provide the URL, it provides the screenshot of the Login Page in Facebook. The same case is with the G-mail, if you want to take a snap of an email and you provide the URL, it gives you the snap of Gmail login page. And the drawbacks go on.

So, I'm done now. I've given you an add-on for Mozilla, Extension For Chrome, An online tool for Screen Capture. Had any problems with these? Feel free to ask.
Read More »

Remove Tags On Photos In Facebook

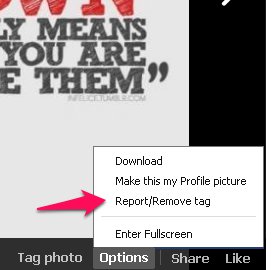
There are a lot of page admins on Facebook trying to spread their page by tagging you in their pics after you like the page. The photos that you're tagged in gets published on your Timeline. In on of my posts I've explained you about reviewing the post but that doesn't remove the tag. So, here is a simple process.

  • Open the image that you were tagged in.
  • Click on the Options below the pic
  • Then, click on the Report/Remove tag
  • Then, select the reason for removing the tag.
  • If you are completely annoyed with the page, click on 'Block' in the next step.
That's it, you're done. Had any problem? Feel free to ask.
Read More »

Switch The Notification Alert Off

The feature in Facebook that is annoying most of the users is the notification alert. If you have a lot of friends who keep on commenting on photos or statuses, you might blow your ears off. Or if you are working and if you get a notification, the sound irritates you. In fact the sound even annoys me. Ever thought of switching off that sound. Here's the process
Click on the image for bigger view
notification alert, notifiacation sound, switch offnotification alert

  • Go To Account Settings and then to Notifications
  • Under How you get notifications click on On Facebook
  • There untick the box.
That's it, you're done. Had any problem? Feel free to ask.
Read More »

Manage The Notifications That You Get From Groups

Restrict The Notifications You Get From Groups
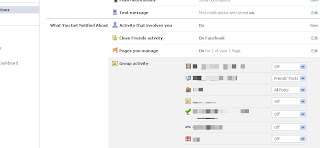
In my last I've mentioned about restricting the notifications that you receive to your email. Facebook groups are more prevalent these days. They help people of same mindset, ideas, views, talent or capabilities to share their ideas and thoughts. But the only problem with these groups is anyone can add you to any group without your approval. All you get is a notifications that you are added to that group. And if this notification is left unseen just because of the notifications that you get from your friends or if you don't care about notifications, there is no way that you are going to know that you are in a particular group. If any person in such group post, comment or like you get a notification. And your notification tab may get flooded just because of the notifications from these type of groups. So, I'm gonna explain about restricting the notifications that you get from groups in Facebook.
block notifications from group
Click On the Image For Bigger View

Here's the process
  • Go to 'Account Settings' and then to 'Notifications'.
  • There, click on 'Groups' under 'What You Get Notified'.
  • You are provided with the list of groups and the posts you are notified about.
 You are provided with three options beside each group you are in. Those three are 'Friends' Posts', 'All Posts' and 'Off'. If you select 'Friends' Posts', you are notified only about the posts that your friends post in the particular group. The same is the case with All Posts. If you choose 'Off', you are notified about any of the posts in the group.
  •  So, select the option that you wish.
Restrict The Notifications That You Get From Applications And Games
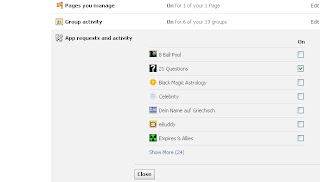
 Now, I know how much fed up you are with the notifications that people send you about games. They are annoying, So, the process is same as the above but there's a slight difference. The process is as follows
block games, block game requests
 
  • The process is same as above until the second step.
  • After that, Click on 'App Requests and Activity'.
  • There, unselect the apps that you would not like to get notifications from.
That's it. You're done. Any problem? Feel free to ask.
Read More »

Restric Facebook Notifications That You Receive Through Email

Most of the teenagers, of this generation, use Facebook and have a lot of friends on Facebook. So, when you get tagged in a pic, you get notification about every single activity on the pic like if someone comments on the pic. And the worst part here is every single notification is sent to your email and your inbox gets messed up with these emails and Facebook notifications. Well, this is the problem faced by most of the Facebook users including me. Well, you can get rid of these emails by restricting the notifications sent to your email. So, here's the process.
Click on the image for bigger view.
Here's the process
  • Go to Account Settings. Then to Notifications
  • Under 'How You Get Notifications' , Click on 'Email'.
  • After that, under 'You'll Receive' you are displayed the notifications that are sent to your email. There select the notifications that you'd like to receive.
  • That's it. You're done. There is no way that your inbox is gonna get messed up.
 So, this is a way in which we can control or restrict the Facebook notifications that are sent to our email.

Any problem with the above process? Feel free to ask.
Read More »

Facebook Plugins for your Blogger

Facebook, the topmost social networking site, is helping bloggers to increase their readers by providing them with many tools. In addition to the 'Like' button for your page, Facebook provides many other features which you may not know. Some of there are Send, Follow, Recommendation, etc. This post is about Facebook's plugins for blogs and websites and their advantages. These plugins help readers to like, comment, send, share the posts they like or follow the blogger or the blog or to sign up for your site with their Facebook site. Being a blogger you gotta be on-par with the social networking tools and plugins.

The following are the plugins provided by Facebook.

Like Button
Most of you might know about this plugin as, I think, this is the most used plugin. This button lets the readers to 'like' a post in your site. As with the Facebook posts, the post which (in your site) reader likes gets published in the reader's friends' newsfeed. The post is visible to all his friends and in this way it drives traffic to your site.

facebook plugin,like button
Send Button
This button helps readers to Send the content in yout site to their friends. This drives traffic as well.
facebook plugins, social plugins,
Like Button Vs. Send Button
The effectiveness of the 'Send' button is more when compared to the 'Like' button and the spread of the 'Send' button is less when compared to the 'Like' button. For instance, If I am one of your reader and I like a post, the post gets shared in my Timeline and all my friends will be able to see it. But there is no assurance that everyone of them will have a look at the post. But in the case of 'Send' button, I can send a personal message to one or a few of my friends and most of them might have a look at it.

Follow Button
The Follow button replaces the Subscribe Button. This allows your readers to subscribe to your account directly from your site.
facebook plugins, social plugins,

A reader, who subscribes or follows you, will recieve your every single post in their newsfeed. So, if the reader responds to the post with a 'Like', 'Comment' or a 'Share', It gets published in his Timeline and this drives traffic to your site.

Comments
This plugin helps your readers to comment on any post in your site. If the reader comment's on your post, it gets published in his friends' newsfeed and this drives traffic to your site.
facebook plugin, social plugins

Activity Feed
This plugin shows readers about the recent Facebook activity in your site. For example, if any of the readers comment, like, send or share any of your posts, the post will be visible in the Activity Feed box for other readers to see the post.
recent activity plugin, social plugins

Recommendations Box
This plugin gives users a personlized list of suggestions for the posts in your site they might like.

Recommendations Bar
This plugin allows readers to share and/or like the content and to get recommendations.

Like Box
This plugin enables users to like your Page in Facebook directly from the site. This buttons is quite different from the like button. Like buttons allows users to like a particular post in your site. On the other hand, Like Box helps users to Like your Facebook Page.

Registration
This plugin allows your readers to sign up for your website with their Facebook account.

Login Button
This plugin, in addition to the Login Button, shows profile pics of the reader's friends who already have signed up for your site.

Facepile
This plugin displays the Facebook profile pics of users who have signed up for your site or have liked your page.
Read More »

Image Optimization In Blogger To Drive Traffic

The main aim of any blogger is to get as many views as possible, I guess. Your images can help you get your more views. All you gotta do is just to put the keywords within the image. Here is the process. But read on till the last word.

About Titles and Tags
The Tags and Titles in the images, that you use in an image, describe about the image to the Google Search Engine bots as these bots cannot read the text on images. So, using these tags and titles you can get more traffic.

Image Tagging
Procedure-1
As soon as you upload an image, you get a code in the HTML. Change the code of the image as follows, adding alt="KEYWORDS" between. KEYWORDS is replaced by your keywords. For example, if the image is of Eminem, you can replace "KEYWORDS" by "slimshady,marshall-mathers". Still didn't get me. Well, go through the images. 
BEFORE
image-tagging,optimise-image,image-optimization,
AFTER
image-tagging,drive-traffic,image-optimisation,
Click on the image for a bigger view
This method, called as image tagging, can bring you a noticeable increase in amount of views by driving traffic.

Procedure-2
Still can't figure it out. Well, here's quite simple and direct process. In blogger, by clicking on the image, you get, options below the image. There, click on the 'Properties'. Now, you are prompted with a pop up asking you to enter the Title and Alternate Search Keywords through text boxes mentioned as 'title text' and 'alt text' respectively. Enter the title and the alternate keywords and that's it, you're done. Piece of cake, ain't it?
Click on the image for a bigger view


A few steps that might help you write alternate keywords for your image
  • Use main keyword while writing both title and tags. Take care that you won't make them same.
  • Do NOT write whole sentences. For example, if your post is about Image Tagging, do not make the tag as "use image tagging to get more views by driving traffic", break it into different but important parts, that will define your post, like "image tagging","drive traffic","image optimization". Hope you got it.
  • Do NOT try to tag a large number of words. Make the tags limited to three or four solid words.
So, that's it I can tell you for now. Keep visiting for new tricks and tools. Happy Blogging :D.
Read More »
 

© 2011. All Rights Reserved | Blogger Tricks 'N' Gadgets | Template by Blogger Widgets

Home | About | Top