Awesome Facebook Status Trick

I think there is no need to tell about the Facebook. Facebook gives a way to all user to share their love and feelings with their friends, parents and all other homies. I think all the peoples around the world are socially connected via Facebook. I was very exited when I came across a awesome status trick of Facebook. I made more searches about it to gain more knowledge about it. So lets see how this tricks will work.

What is Facebook Status Trick:-


Whenever you update your status in Facebook it looks as shown in picture below. So in this tutorial I am


going to explain you how you can change via mobile with different words.

Have you seen the result? I simply change mobile to Mom's computer. So lets see how to use this trick.

How to use Facebook status trick:-

  1. Login to your Facebook account.
  2. Now copy the code below and paste it in the address bar.
http://www.facebook.com/connect/prompt_feed.php?preview=true&
api_key=2254487659


Note:- If you are using any proxy site to serf Facebook then url code will look like this.

    http://www.Proxy-site.com/connect/prompt_feed.php?preview=true&
    api_key=2254487659
    1. Update your current status and click share.
    1. And you will get status updated via Blackberry.
    2.  
    Below is the complete list of API code through which you can change your status with various name. 
    01. My Bedroom (174811032586879) 
    02. Your moms computer (132386310127809) 
    03. Skynet (249284985083592) 
    04. Blackberry (2254487659) 
    05. Palm (7081486362) 
    06. Sidekick (21810043296) 
    07. Sony Ericsson (38125372145) 
    08. Xbox LIVE (5747726667) 
    09. Foursquare (86734274142) 
    10. Telegram (140881489259157) 
     11. Morse Code (134929696530963) 
    12. Message in a Bottle (123903037653697) 
     13. Mind Computer Interface (121111184600360) 
    14. eyePhone (110455835670222) 15. Toaster (203192803063920) 
    16. microwave (0a5266c8844a1b09211e7eb38242ac2f) 
    17. Strawberry (a4c9fb1708a848c2241674531176209b) 
    18. The moon (221826277855257) 
    19. Dr. Pepper (eea90d40e1d12565695dbbbdbd5e965b) 
     20. iPod Nano (142039005875499) 
    21. Your Mums Bedroom (5f64bbc9ac2f12b983200925da461322)
    22. Refrigerator (250828364944350) 
    23. Nasa Satellite (31d608d30292175bf7703149699ccb39) 
    24. Google+ (4d8243dbb7064f88351fe6c809582320) 
    25. Smoke Signal (134138923334682) 
    26. The Future (108372819220732) 
    27. Typewriter (d3d554bf60297cb2c384e3d7cf5a066d) 
    28. Harry Potter (b8ebeb983f45eaa0bd5f4f66cad97654) 
    29. Pogo Stick (185103391549701) 
    30. Sperm Whale (170318539700306) 
    31. Microsoft Excel (242740155751069) 
    32. A potato (127926427295267) 
    33. Banana Phone (1477a4cd29ec724a3de19be5d26e0389) 
    34. Pip Boy (142806259133078) 
    35. Post-It Note (115227201900831) 
    36. Airwolf (123944137696757) 
    37. Nintendo 64 (236264753062118) 
    38. Alcohol (250335888312118) 
    39. Cheese (218791271497130)
     Just copy the code within Bracket and paste it trepalce last part of the url for example:-
    • For "My Bedroom" , the code will look like this.
      http://www.Proxy-site.com/connect/prompt_feed.php?preview=true&
      api_key=174811032586879
      Now finally it is a time to confused your friends through this trick. I give my best to produce this article if anyone find any difficulty in doing this process then comments are always open for that or if you like the above article then don't forget to subscribe it for latest updates.
Read More »

Improve Traffic By Facebook Fan page

black_facebook_iconMost of the Blogger receives huge amount of traffic daily through Facebook. Now a day Facebook become an effective way to increase traffic for a Blog as Facebook allows our user to create a page to promote their Blog or Business. That's why we can't neglect the importance of Facebook. Previously, I was shared a article to Import Blog post automatically on Facebook wall. But today in this article you will learn to create Facebook fan page for Blogger or to import Blog post in it. So lets start the tutorial.
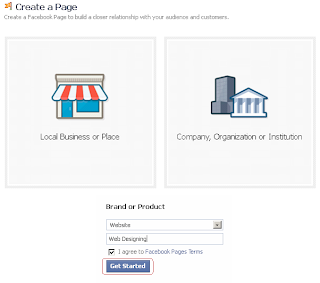

How to Make a Facebook Fan Page:-

  1. Login to your Facebook account.
  2. Go to the following link.

http://www.facebook.com/pages/create.php
  1. Click the category that your blog best fits under.
facebook brand page
  1. Upload an image for your Facebook fan page.
  2. In next option you can add basic information such as website and page description.
  3. Now your fan page is ready.

    How to Import Blog Post to Facebook Fan Page:-

    Previously, I was shared a article to import blog post to Facebook wall but now I will show you to import blog post to Facebook fan page.
    1. Login to your Facebook account first.
    2. Click on the following link.
      http://twitterfeed.com
      1. Create a new account in this site.
      twitterreed enter url
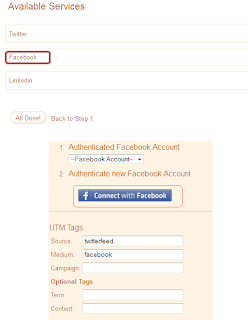
      1. Choose page in which you want to import your blog post.
      2. Finally hit "create service" at the bottom of the page.
      If any one find difficulty in doing this process then comments are always open for that or if you like the above article then don't forget to subscribe it for latest updates. Another nice article by the same author Awesome Facebook Trick .
Read More »

Imort Blog posts to facebook Wall Automatically

Facebook is one of the best social networking website. You can easily promote your blog via Facebook there are so many Facebook apps available for import your blog posts to Facebook but you can do it without using any Facebook app.

1.Go to your Facebook homepage.

2 Click "Notes" at left side.


3.And then click "Write a note".

4.Firstly click "My notes" and then "Edit import settings".
5.Click "Confirm".

Read More »

Connect Facebook Without Internet

As we all know Facebook is most popular social networking site all over the world. India has estimated 34 million registered users. To expand its roots more deeper into villagers and rural areas, it came with an fantastic free service. Now Facebook users in India can access Facebook on any mobile without having any internet connection by dialing *325#. You can even access Facebook on mobile which have no browser support like Nokia 1100. Facebook India who partnered with Fontewish to bring Facebook on every mobile phone without any app or even internet connection. So lets see How this trick will works ?


How to Access Facebook Without Internet:-

  1. Just dial *325# from your mobile and wait for the confirmation message on the screen.
  2. Simply dial your Facebook username ( Email ID ).
  3. Have a look at screenshots below for step by step guide.


Unfortunately, this service is currently available on Tata Docomo, Airtel and Aircel only.


But don't worry this service will be available in other telecom service sooner. You can get more information by visiting the official blog of Facebook.
Read More »

Find Who Unfriend you on Facebook


Generally, Facebook won't notify you when people unfriend or remove you from their friend list. Suppose you have 425 friends on Facebook yesterday but today number decreases to 421. How do you find the names of those four peoples who decided to unfriend you on Facebook. So a free web app which will notify you when someone unfriend or remove you from their friend list is a solution of this problem. Twenty Feet can help you to reveal the names of your ex-friend. But the services offered by this site are not free, you can use that services for a short period only. So lets adopt another method.


There is free Firefox Add-ons called Unfriend Finder which will help you to find the names of your ex-friends.

Features Of Unfriend Finder:

  • Easily integrate with your Facebook account.
  • Create a separate icon in menu bar which shows how many friend unfriend you from their friend's list.
  • You will get immediately notified when anyone unfriend you.
  • Find out who did not accept your friend request or who ignored your friend request.

    How to Install Unfriend Finder On Facebook:

    1. Unfriend Finder compatible only with Firefox, Chrome, Opera, Safari.
    2. Visit the official page of Unfriend Finder.
    3. Follow the instruction on the "download" page.
    4. Find your ex-friends and enjoy.
    Note: All downloading and installing steps are on the official page of this app. But if any one of you are unable to perform the task then comments are always open for that.
Read More »

How to take Backup of Blogger template


Today I am going to explain you a simple article about the backup of template. Most of the people think that there is no need to take any backup of the template. For this reason I am going to explain you how to take backup of the template ? It is strongly recommend by me or most of the web developer that backup of the template is necessary whenever you are interested to edit it.

Why take backup of template:-

Suppose you don't know HTML, CSS or XML like languages and make some mistake in blogger template without any backup then it will provide a great hesitation to you because there is no way to recover that template again. So backup of the template is the only key to protect template from losses.


How to Take Backup of the Template:-

There are two methods to take backup of the template. We will discuss both two methods here.

Method 1:-

  1. Login to Blogger Dashboard.
  2. Go to Design / Edit HTML.
  3. Click "Download Full Template"


  1. Save file (.xml) in your local computer.

    How to restore template from Backup:-

    1. Click "Browse" button and open file saved in step 4.
    template
    1. Hit "upload" button.
    2. And finally you have done.

      Method 2:-

      Generally this is not a predefined method but this is preferred by most of the Web developer.
      1. Hit "Expand Widget Template".
      2. Select and copy the whole blogger template.
      copy
      1. And Paste the whole code in any text editor like notepad or wordpad.
      I think this article will definitely helpful for you. If you like the above article then don't forget to subscribe it for latest updates.
Read More »

How To remove Title of Sidebar Widget

Remove_sidebar_widget_heading

Sidebar usually contains important widgets like Search Bar, Popular Post, Facebook like widget etc. All these widgets have title appearance which is same for all the widgets and that are controlled through your template. So today in this post I will tell you to remove title or heading appearance for a particular widget. From figure you can seen that I have removed the tittle of Facebook like page by making a small modification in blogger Template. you can also easily remove the tittle of any sidebar widget. So lets start the tutorial.


How To Remove Tittle Of Sidebar Widget:-


  1. In Blogger Dashboard Go to Design / Edit HTML.
  2. Click "Expand Widget Template".
  3. Download the Full template before making any changes in it (More info).

How To Remove Tittle of Facebook like Page:-

  • Find following piece of code in blogger template.
<b:widget id='HTML1' locked='false' title='Find us on Facebook' type='HTML'>

<b:includable id='main'>
  <!-- only display title if it's non-empty -->
   <b:if cond='data:title'>
    <h2><data:title/></h2>
  </b:if>
  <div class='widget-content'>

    <data:content/>
  </div>
  • If you want to remove title of Facebook like Page then the corresponding code will be.
<b:widget id='HTML1' locked='false' title='Find us on Facebook' type='HTML'>
<b:includable id='main'>
  <!-- only display title if it's non-empty -->
    

  <div class='widget-content'>

    <data:content/>
  </div>
  • Save the template, Now your Facebook widget will shows up with no tittle.

How to remove Tittle of Subscribe Via Email:-

  • In a similar way you can also remove title of this widget. Just find the code below and remove the red part containing it.
<b:widget id='HTML2' locked='false' title='Subscribe via email' type='HTML'>
<b:includable id='main'>
  <!-- only display title if it's non-empty -->

  <b:if cond='data:title != &quot;&quot;'>
    <h2 class='title'><data:title/></h2>
  </b:if>
  <div class='widget-content'>
    <data:content/>

  </div>
.
.
.

How to Remove Title OF Blog Archive:-

  • Search for following piece of code and remove the red part from the code.
<b:widget id='BlogArchive1' locked='false' title='Blog Archive' type='BlogArchive'>
<b:includable id='main'>
  <b:if cond='data:title'>
    <h2><data:title/></h2>

  </b:if>
  <div class='widget-content'>
  <div id='ArchiveList'>
  .
  .
  .

How to Remove Title OF Labels:-

  • Search for following code and remove the red part of the code.
<b:widget id='Label1' locked='false' title='Labels' type='Label'>
<b:includable id='main'>

  <b:if cond='data:title'>
    <h2><data:title/></h2>
  </b:if>
  <div expr:class='&quot;widget-content &quot; + data:display + &quot;-label-widget-content&quot;'>

.
.
.
M
Read More »

How To Make Scroll Bar ar Blogspot


Most Blogger still confuse with "How to Make Scroll Bar Function at blogspot", today I wanna give you the tips how to make it.

Scrool bar has a function to minimize our page beside make beautiful our blog page. Ok lets do it now...

to make the scroll bar function you just copy and paste this code to your blog, and change "Your Text Here" with your text....


<div style="overflow:auto;width:300px;height:200px;padding:10px;border:1px solid #eee">Your Text here here!</div>


Example


<div style="overflow:auto;width:300px;height:200px;padding:10px;border:1px solid #eee"> <br /><ul><br /><li><a href="http://web-site-tutorial.blogspot.com/2009/06/how-to-increase-and-decrease-text-size.html" target="_blank">How to Increase and Decrease Text Size at Blogspot</a></li><br /><br /><li><a href="http://web-site-tutorial.blogspot.com/2009/06/how-to-make-top-commentators-widget-at.html" target="_blank">How to Make Top Commentators Widget at Blogspot</a></li><br /><br /><li><a href="http://web-site-tutorial.blogspot.com/2009/06/how-to-make-social-bookmark-widget-at.html" target="_blank">How to Make Social Bookmark Widget at Blogspot</a></li><br /><br /><li><a href=" http://web-site-tutorial.blogspot.com/2009/06/how-to-make-table-of-content-at.html" target="_blank"> How to Make Table of Content at Blogspot</a></li><br /><br /><li><a href=" http://web-site-tutorial.blogspot.com/2009/06/how-to-make-your-blog-title-seo.html" target="_blank"> How to Make Your Blog Title SEO Friendly</a></li><br /><br /><li><a href=" http://web-site-tutorial.blogspot.com/2009/05/how-to-avoid-table-space-at-blogger.html" target="_blank"> How to Avoid Table Space at Blogger</a></li><br /><br /><li><a href=" http://web-site-tutorial.blogspot.com/2009/05/how-to-make-table-at-blogger.html" target="_blank"> How to Make Table at Blogger</a></li><br /><br /><li><a href=" http://web-site-tutorial.blogspot.com/2009/04/how-to-remove-blogger-label-number.html" target="_blank"> How to Remove Blogger Label Number</a></li><br /><br /><li><a href=" http://web-site-tutorial.blogspot.com/2009/05/how-to-make-recent-comments-at-blogger.html" target="_blank"> How to Make Recent Comments at Blogger</a></li><br /><br /><li><a href=" http://web-site-tutorial.blogspot.com/2009/05/how-to-make-recent-post-at-blogger.html" target="_blank"> How to Make Recent Post at Blogger</a></li><br /><br /><br /></ul><br /></div><br /><br />


The Result Like this


I hope you did not confuse again about how to make scrolling function after my explaining....
Read More »
 

© 2011. All Rights Reserved | Blogger Tricks 'N' Gadgets | Template by Blogger Widgets

Home | About | Top